Saturday, March 7, 2009

(Painted) blue bayou (ha,get it?get it?).. the tutorial


After I painted this little, blue table. I received a lot of questions on how I did the glazing.. so here is the nitty-gritty tutorial... This is so easy, you'll glaze EVERTHING!
You'll need:
paint color of choice
paint (to glaze with) color
glaze
paper towels
brush
stir stick

I used Stratton Blue HC-142 in Benjamin Moore paint as my base color. It is   a great blue with a bit of turquoise underneath. In pictures though i know it's so hard to tell exact color.

 I had this left over table floating around. So after a coat of paint (this time I used Stratton Blue,  cut by 50%.) Did you know the paint store will do that.. Cut your paint? They will by 25, 50, or 75 percent. So if there is a color you love, but you think if it were just a bit lighter, there's a great solution.
After the paint has cured a few days... You're going to mix your paint and glaze.
The paint color I used was Tudor Brown EXT.RM (in satin finish). It's a great chocolatey color I used in this bathroom. You can use any brown color you like, you can even use craft paint. Just buy the higher quality stuff such as  Folk Art or Americana.
For my project, mix your paint and glaze in equal parts (50/50). IF you don't want to buy the HUGE can of glaze at the paint store,the craft store sells smaller containers. If you can't find it in the craft paint aisle, they also sell it in the fine art section. 

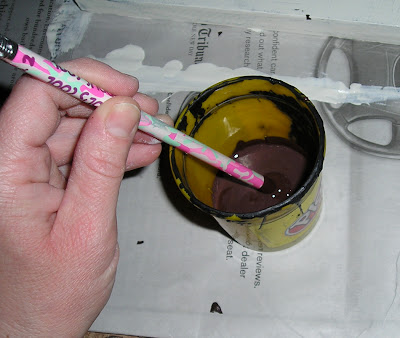
It will look milky and the more you mix it, the better it will look.Do you like my pencil.. and my old play dough container? I go for the high tech paint equipment around here.
If you want your glaze to be more translucent, use 1 part paint to 3 parts glaze (25/75). Heavier and darker brown,  1 part glaze to 3 parts paint. I just eyeball mine. If you're a tad bit off, it's okay.  You can always add more of either later, or do a sample board and play with your ratios.

Use a paint brush to run the glaze/paint mixture into the crevasses, then wipe off the excess right away with a dry paper towel.  If you mess up, just clean it off with a damp paper towel.
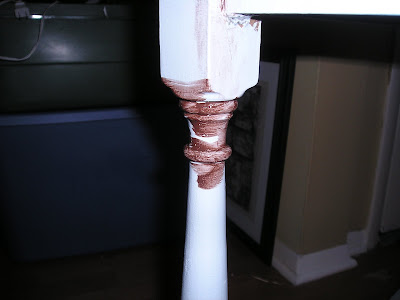
With turned legs, it's easiest to apply your glaze, 

then wrap your fingers with the towel around it and twist. 
Continue doing the entire piece in this manner. 
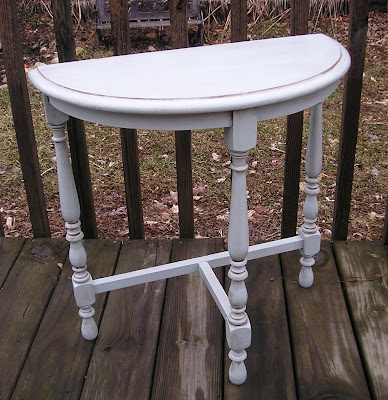
The biggest trick to using glaze is DO NOT paint glaze over a fresh glazed area; you'll lift the old glaze right up and leave funky patches.

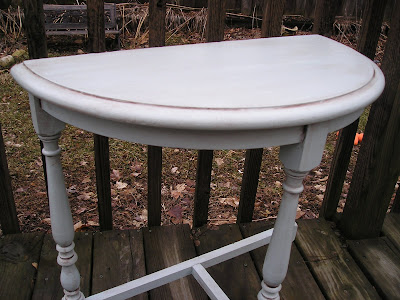
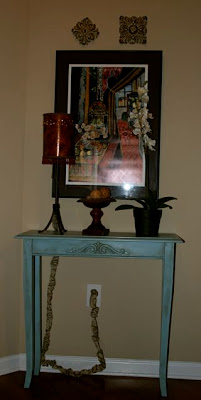
And you end up with the perfect little, blue, glazed table.
If you feel unsure about jumping in until you get  a feel for it, use a practice board. 
It's only paint. Even if you think you've messed up, either wipe it off or paint over it. 

One of my reader's, Anne M. was one of the first to e-mail me for my technique.  She had wanted a less turqoise-y color so we ended up picking Marlboro Blue HC-153.
Here's another paint secret I shared with Anne. Sherwin Williams will color match any color and any brand paint strip in their sampler paints. The best part is their samplers are about a full QUART and are under $6. More than enough to do a small piece of furniture or two.
Here is how Anne's piece turned out.
Didn't she do a great job? It's fabulous! And I love how she accessorized the table. 
And Karyn told me she's a little glaze happy now!
I hope this helps every one! feel free to e-mail me if there was anything else you need to know!
 :) Jen

33 comments:

  1. You are really sweet to show people how to do this. Remember when I asked about hiring you? I meant if I showed you a piece of furniture, and I hired you to tell me what to do with it. I see such cool pieces at thrift shops, but can't get the vision. What do you think?

    LOVE LOVE LOVE That blue!!!

    ReplyDelete
  2. Man, oh, man, I love that blue table!!!!! So gorgeous!

    Suzanne

    ReplyDelete
  3. Beautiful job and great tutorial!!
    blessings,
    kari & kijsa

    ReplyDelete
  4. You did a great job...love that blue

    ReplyDelete
  5. Great instructions. I actually think I can do this now. Love your blog.

    ReplyDelete
  6. Thanks for sharing!! I cant wait to try something like this!!

    ReplyDelete
  7. great tutorial my friend!!
    xo

    ReplyDelete
  8. Thanks for posting my little blue table Jen! I usually take whatever brown paint I have on hand to glaze with but I am especially attached to RL technique tinted in Tea Stain. I have used it with great success over a cream with to to my master bedroom casegoods. Is the Tudor Brown you mentioned at BM color?

    Keep posting your furniture makeovers...Spring is here and I am itching to transform more pieces of furniture!

    ReplyDelete
  9. You are so kind to post that tutorial. Thank you so much for taking the time to write it all out with pictures.

    I'm embarrased to say I never knew you added paint and glaze together. I've just used a bottle of Valspar "Antiquing Glaze" from Lowe's. I can't wait to try out the way you do it!

    ReplyDelete
  10. Love that table and your finish. The table just had good bones! Awesome!

    ReplyDelete
  11. Hi! I got your email and rushed over to your blog this morning! It was really nice of you to offer out your technique. I just got back from a three day junking trip, and now I'm inspired to transform some of the things I bought! Thank you! You are very talented!

    ReplyDelete
  12. This inspires me to dig out my paints. I love that color of blue you used on the first table!

    ReplyDelete
  13. Hey! What is that little cord cover thingy??? I have a pet peeve about cords showing but of course you know sometimes you can't help it! That looks like something I might want to try.

    And also, I love the blue table!

    ReplyDelete
  14. Your work is always so pretty! Just love that little blue table...thanks for the tutorial. I have a kitchen island makeover that I was thinking of glazing.


    DebraK

    ReplyDelete
  15. This is such a pretty table. You did a fantastic job on it. Thanks for sharing the details on how you did it! :) Love your blog.

    Hugs & Blessings,

    ~Katherine~
    CountryRomantic.blogspot.com

    ReplyDelete
  16. Oooh I love it. Gorgeous...Okay where in the western suburb of Chicago do you live? I grew up in Elgin.

    ReplyDelete
  17. Very cool! Yes I get it! HA ha ha! You are too punny! ;)

    Thank you for visiting my blog and commenting on the opal tatting shuttle. To answer your question: I tatted a bracelet once, actually it was a fancy wristlet to hang my teeny tiny cell phone that I had once, LOL! The cell phone is long gone and I can no longer find the wristlet. I am not really into tatted jewelry and as of yet I do not sell. I have done swaps before, though!

    ReplyDelete
  18. Oh, I love it! thanks for the great tutorial, I'll give this a try!

    ReplyDelete
  19. What a great technique. I recently painted a small cabinet a Benjamin Moore color that is extremely similar - Covington Blue; however, I think the glaze would absolutely finish off my piece. I may try this!

    -FringeGirl

    ReplyDelete
  20. Thanks for sharing your secrets....I'm going to find an old sumthin sumthin and give this a try!

    ReplyDelete
  21. I love it! I can't wait to try this - thanks so much for the info!

    ReplyDelete
  22. WOW. What an amazing result. The table had such lovely lines to begin with, but your finish took it to a whole other level. LOVE it!

    ReplyDelete
  23. Thank you so very much for the tutorial. I have never tried using a glaze but I wanted to. You've inspired me to try it.

    Gretchen

    ReplyDelete
  24. Thanks for the awesome tutorial! I am going to find something I can paint to try it! ;) And the Sherwin Williams tip is fabulous! I will definitely be making note of that for the future!!!

    ReplyDelete
  25. Very nice tutorial. With this warm weather I am getting the painting bug but I little timid of glaze. Now I think I am going to give it a try. Why not, what do I have to lose. Question. How do you prime your furniture? I have an old piece of furnitre- like lots of coats of paint. Should I strip everything then get started or should I just sand, prime and jump right in? Just wondering your advise. I will shoot a note over when I get some of my paining projects done. Great post! Maridith

    ReplyDelete
  26. Jen, as usual, it look FAB! I found a great product to top coat all my furniture and cabinets! You have to check it out. See my blog for details...

    ReplyDelete
  27. I love that blue table and thanks for the tutorial. I have to show my husband your technique. He's painting everything black right now but I have a table I'd love to paint like this. :)Nancy

    ReplyDelete
  28. You are such a doll to share your techniques. I've been working on a bookcase (my first project other than a chair), and this may actually save it....I also didn't know about asking the paint store to 'cut' the paint color. I adore your blog and have become a follower. I'm a newbie to DYI and I have a lot to learn!

    ReplyDelete
  29. Just used this brilliant! technique on my first piece ever, a sideboard of all things. Tudor Brown glaze over BM Marlboro blue. Worked well with trim, but brushstrokes on broader areas looked "clunky" or too heavy-handed. Solved it by letting it dry an hour or two and then taking Mr. Clean's Magic Sponge to it. Very happy with results. Damp Magic Sponge blended the brush marks for a wonderfully subtle effect. Enabled me to "control" where antique coloration showed up and how dark for more naturally aged look. Must be careful with overdoing it, though. Thank you for making this project so much easier than if I had to use candle wax and a cheese knife, trying to remember exactly where I had applied wax. xoxo

    ReplyDelete
  30. Wow this is perfect, I am glad I found it. I have a large (poster size) frame that I painted dark brown for a blue room and I am not happy at all with it. I am going to re-paint it light blue and glaze it. Thanks for info!

    ReplyDelete
  31. Thanks for the tutorial!! I love both tables!!

    ReplyDelete

Thank you so much for taking the time to leave a comment! I read and appreciate every single one! Please leave an e-mail or contact if you have a question, otherwise I have no way to answer you!

LinkWithin

Blog Widget by LinkWithin