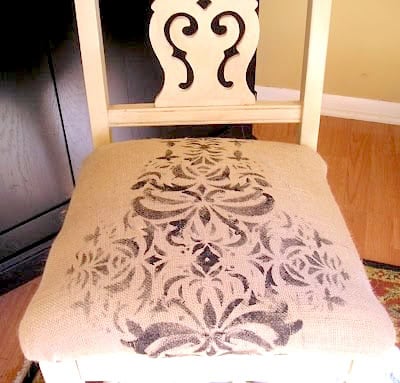
Tuesday, October 13, 2009

Hand stamping on burlap...

Here's the post you've all been asking about! How to hand-stamp on burlap.
It's a great technique and you can do numbers, words, or even make your own patterned fabric!

The biggest things to remember is... 1. burlap has a very rough, open weave; so chunkier stamps work better. Little details will be lost.
and... 2. Unlike stamping on other fabrics, don't use straight fabric paint. It's too thin. You're better mixing fabric paint and a stiffer acrylic paint.

You want to do a mix of either equal parts of fabric paint and acrylic paint, or 3 parts acrylic paint and one part fabric textile medium ( a medium that makes any acrylic paint into fabric paint you can find at craft stores.). This will make it so you can wash it, and keep it flexible enough so the paint doesn't get crunchy or flakey.

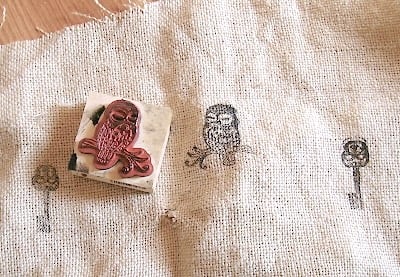
Brush your paint onto your stamp. Keep a wet paper towel handy because any paint left on your stamp when you're done will ruin it. Go a little heavier than normal because burlap will suck up the paint a bit.

Press very firmly.


Less detailed stamps definitely work much better.

Besides stamping,
you can also stencil with the same paint mix.
Again, the less detail the better.

Position your stencil.

Off-load any goopey paint onto a paper towel,
then use a stiff paint brush and pounce it in, you may need to go over an area several times.

Keep going until it's as dark as you would like.

Then get decorating with it!


Jen

24 Creative people said:

  1. totally perfecty.
    you are amazing.
    love,
    the NON CRAFTY QUEEN B.
    but with your tutorial, anything is possible.
    thanks

    ReplyDelete
  2. Totally bookmarking this post. Thanks for the awesome tutorial...
    peace :o)

    ReplyDelete
  3. Thanks for this information! I just recovered a little foot stool with burlap and want to monogram it. Now all I have to do is find the monogram I want....

    ReplyDelete
  4. I knew you would give us a tutorial!! Thanks so much!!! You are the best!

    ReplyDelete
  5. Thanks for the tutorial! I've stamped on canvas but haven't tried burlap yet. I'll have to try it using your technique :).

    ReplyDelete
  6. Thanks for sharing the technique! :) Have you ever tried Staz On?

    ReplyDelete
  7. Thanks so much for the tutorial. I've been wanting to do something with burlap and this will be helpful if I ever get to it! :-) Love the chair...

    ReplyDelete
  8. I can't wait to try this! Thanks!!

    ReplyDelete
  9. Thank you so much for this helpful post. I was working on some burlap pillows just today and thought about trying to stamp my image instead of painting or iron-on! I love how they loose some of the image...like its been there a while and has slightly worn.
    Have a creative week...dj

    ReplyDelete
  10. how cool is that????? that seems easy enough for even ME to do!! i will give it a try!

    ReplyDelete
  11. Oh, I LOVE this idea of yours! I especially like the stenciling you did and then used to recover your chair! AMAZING! :) Thank you for sharing how to do this! :) Have a good night!

    ReplyDelete
  12. thank you thank you thank you!!! Oh thank you!!! I didn't know what paint to use so i've been putting this off now i can give it a go... yippy!!!
    xo,
    LuLu

    ReplyDelete
  13. Thanks for the tutorial. I love learning stuff like this that you can end up using on so many different crafts!

    ReplyDelete
  14. this is a great tutorial...thank you:)

    mary

    ReplyDelete
  15. Thanks Jen! This is awesome, something I've wanted to try, I'm so glad to have REAL directions from an expert! :)

    ReplyDelete
  16. You are so right, this is EXACTLY the post I've been waiting for! I can't wait to get started, thanks Jen!
    Anne

    ReplyDelete
  17. I like the look. I've been thinking about doing it to a pillow. Thanks for the tutorial.

    -FringeGirl

    ReplyDelete
  18. love this!! you are amazing, so glad i found you blog...will be checking in often!!

    ReplyDelete
  19. Sweet...have to remember that for my halloween party planning.

    ReplyDelete
  20. Thanks so much Jen! I'm going to add a link to your tutorial in my Burlap/Jute post. :)

    Roeshel

    ReplyDelete
  21. love the damask pattern, lovely thanks for sharing

    ReplyDelete
  22. How great Jen! You know how much we all love burlap!

    :) T

    ReplyDelete

Thank you so much for taking the time to leave a comment! I read and appreciate every single one! Please leave an e-mail or contact if you have a question, otherwise I have no way to answer you!

Blog Widget by LinkWithin