Make a MERRY Christmas Garland
I had so many questions about how I made my banner for 3 French Hens, That I thought I would show you by doing a really cute, holiday merry banner project, it’s a super easy craft to DIY too. This tutorial has the letters as free printables below to many your easy paper Christmas garland. It’s fun to make your own Christmas decorations and an inexpensive way to decorate a faux fireplace mantel or stairway railing.

Supplies to make your free printable Christmas merry banner
White cardstock.
Grommets ( craft eyelets)
Grommet Tool
Scissors
Paper edge punch
Hole punch
Twine or ribbon
Start by printing your letters printed on your printer white card stock on your home printer or have them printed at your local printer. (The templates are at the end of the post.). Regular printer paper is too thin to use for a banner and won’t hold up.

These little buggers are officially called eyelets. I want to call them grommets. You can find the brass ones at Micheal’s. But I know Joann’s and Hobby Lobby also carry the gold and silver and in the scrap booking section I’ve seen multi-colored and shapes. Go crazy! 🙂

They also carry the grommet-squeezer thing. I don’t know the official name for it. If you don’t have eyelets you can skip this step, the paper might be more likely to tear.

After printing your letters to size, trim them till you have about an inch around each letter. Sometimes it helps to line up all of the letters and trim them at the same time as long as the paper isn’t too thick.

Punch with your shape puncher around the edges. I bought mine at Joann’s with a 40% off coupon. I think it’s by EK. I like this one because you can line up your previous punches. I found out that if you also sign up your husband at Joann’s, you get two coupons in the mail each month.

Dress up the edges of you Merry Christmas Banner with a paper trimmer edge punch
Punch all the way around. If you get a funky edge like this, no sweat, just give it a little trim; no one will notice. Punch your holes in about the same place on each letter sheet.

Once your hole is punched in the top of the cardstock, it’s time to do your eyelets. Place one in the hole and then like up your tool.

Place an eyelet in the hole with the front and the back place on each side and then like up your tool to squeeze both sides together.
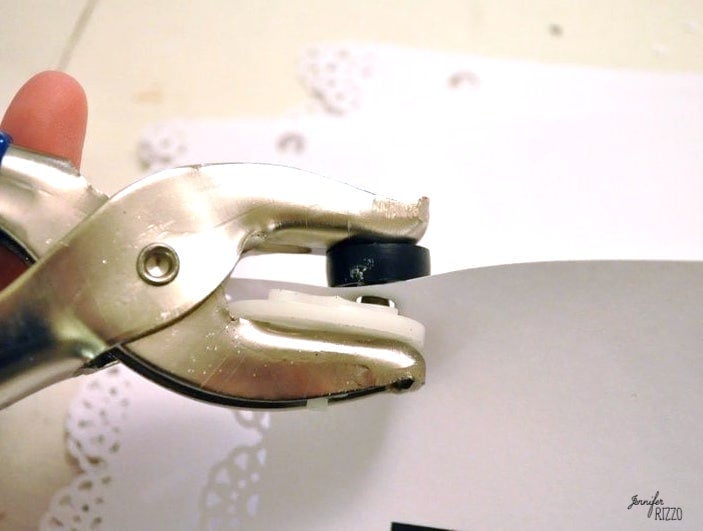
Press the tool firmly together like a hole punch.

And viola! You have eyelet magic! I will tell you, one you figure it out, it is addicting!

Once all of your free Christmas printables letters are punched, then you are ready to add your twine, or ribbon.

String it through the last card first, into the first hole and then behind to come out the other hole, so that your string is behind the letter. Do the same thing for each letter.

Once they are all strung, tie a loop in each end, and hang! If you wanted you could totally use a little glue and glitter it up and make it sparkly and full of Christmas cheer! Hang it on your faux fireplace with fresh evergreen grennery and ornaments. You could even use yarn to create a boho syyle banner to accent the Merry garland. Of course always keep out of reach of children and pets since the twine is a strangulation hazard and I have mine hung over a non-functioning fireplace mantel.

And you have a cute Merry, banner! My letters all measure about 4-5 inches across, but you can make them any size you like. It would be a fun idea to make smaller versions of this to dress up gift packages or on a Christmas tree.
Happy garland making! To grab these images just save to your computer as a PDF file or a JPG. If you like making your own holiday decorations, see how to make glittered vintage ice skates.


If you are reading this post at any other sites or blogs besides Jenniferrizzo.com, your rss feed,e-mail or in your reader this is stolen content.
*This was posted Via Jennifer Rizzo. com
Great tutorial i love it thanks for sharing xxx
Jen –
That looks awesome(!) and it is already on your new fireplace. Thanks for the detailed lesson. I think even I could do this project.
Merry to you back.
Connie LOU
That is pretty! Good tutorial too~the grommets make it look so much more professional.
Jen, what an awesome tutorial!! Love it!!
Jennifer I love it!!
I totally need to get a grommet thingie soon!
Thank you for your awesome tutorial~
Jen, this is a great tutorial and thanks for sharing the letters…looks really good!
Love this! I am excited to try it. I am glad to hear 3 French Hens went well. I am sad I couldn’t make it. Hope you have a happy Holiday season.
This is fun and beautiful… Perfect for the season. Thank you for sharing.
so cute–thanks for the pattern!
LOVE that banner! Thanks for sharing your tutorial!
Wow…it is lovely Jen…I have to say too I saw your fireplace and I love it…I can not believe someone just trashed it…Have a great day! xo
So cute!
Thank you, I’m going to work on mine right now!
I am totally going to make one of those! Thanks Jennifer.:)
I also wanted to let you know that I blogged about the hat you sent me. Here’s the link: http://moonflowersalina.blogspot.com/2011/11/jennifer-rizzo-hat.html
Imádom a munkáidat. Zsóka
LOVE this. Thanks for sharing!!! Off to see where i can put one. xo
Thanks for sharing. I love it. I’m gonna make a few.
Although I probably won’t have the time to make this…I sure did enjoy living vicariously through your tutorial! Your decor looks so festive!
It’s beautiful!
i have it give it a go and get crafting!!!!
wishing you a wonderful week,
xo,
Lulu
Pinned this puppy 🙂 You’re so craft and your tutorials are always great!
Muchas gracias por enseñarnos a hacer detalles tan lindos.
This is so darn cute, Jenn!
Love those lacy edged sheers. May have to go get some of those for homemade Valentines.
Merry Christmas to you and your family.
xox
Alison
Thank you so much for sharing! Went right away and made one of these…so sweet and easy and everyone loves it! One quick question….the letters that you have for downloading and printing…are there other letters of the same design we can find? Would make a cute birthday banner also:) Thanks again!!~~Blessings~~Shine
I love the Merry Banner and want to make for our school christmas card. Do you know the name of the font that was used? I would like to add “Christmas” to the banner.
I think it’s either cast iron or romatiques, but I am not sure.